Introduction To Terraform - Infrastucture as Code (IaC)
Posted on May 29, 2023 (Last modified on March 8, 2024) • 6 min read • 1,133 wordsIntroduction to using Terraform to provision infrastructure resources and why IaC can be useful to the homelabber as much as it is to large organisations

Introduction
Infrastructure provisioning and management have become pivotal for organisations seeking agility, scalability, and efficiency. Traditional manual processes are no longer sufficient to keep up with the demands of modern infrastructure deployment. This is where Terraform, an open-source infrastructure as code (IaC) tool, comes into play.
What is Terraform?
Terraform, developed by HashiCorp, is a powerful tool that enables users to define and provision infrastructure resources declaratively. It treats infrastructure as code, allowing you to describe your desired infrastructure state in a declarative configuration language, known as HashiCorp Configuration Language (HCL). Terraform then automates the process of provisioning and managing infrastructure resources across various cloud providers, data centers, services and on-prem. Learn more in the official HashiCorp Docs
Key Benefits of Terraform:
- Infrastructure as Code (IaC): Terraform embraces the concept of IaC, enabling you to codify your infrastructure requirements and version control your infrastructure configurations. This approach brings numerous advantages, including increased repeatability, consistency, and collaboration among team members.
- Multi-Cloud and Multi-Provider Support: Terraform is cloud-agnostic, meaning it can provision resources across multiple cloud platforms such as Amazon Web Services (AWS), Microsoft Azure, Google Cloud Platform (GCP), and more. It also supports on-premises data centers and other infrastructure providers, giving you flexibility and avoiding vendor lock-in.
- Declarative Configuration: With Terraform, you define your desired infrastructure state rather than scripting the specific steps to achieve it. This declarative approach allows Terraform to determine the most efficient way to create or modify resources while maintaining the desired state. It simplifies resource management and reduces the risk of human error.
- Infrastructure Orchestration and Dependency Management: Terraform manages infrastructure dependencies by analysing the relationships between resources. It automatically plans and executes changes in the correct order, taking care of resource dependencies and ensuring the integrity of your infrastructure.
Getting Started with Terraform
To begin using Terraform, you need to follow a few essential steps:
- Installation: Start by installing Terraform on your local machine or development environment. It is available for major operating systems and can be easily downloaded/installed from the Terraform downloads page.
- Configuration: Create a Terraform configuration file (usually named
main.tf), where you define your desired infrastructure resources, providers, and variables. This file will serve as the blueprint for your infrastructure. - Provider Configuration: Specify the cloud provider or infrastructure platform you want to provision resources on. Each provider has its own configuration block within the Terraform file, allowing you to set authentication credentials, region-specific details, and other provider-specific settings. You can find providers in the providers registry. Some common providers include: AWS, Azure, Google Cloud Platform (GCP), Kubernetes and Cloudflare
- Resource Definition: Declare the resources you wish to create or manage, such as virtual machines, networks, storage, and load balancers. Terraform provides a vast range of resource types, and you can define their attributes, dependencies, and other settings.
- Initialisation: Run the
terraform initcommand to initialize the Terraform environment in your project directory. This command downloads the necessary provider plugins and sets up the backend for state storage. - Planning and Execution: Execute
terraform planto preview the changes Terraform will apply to your infrastructure. This step is essential for reviewing and validating your configuration. To apply the changes, runterraform apply. Terraform will orchestrate the necessary actions to achieve the desired infrastructure state. - Continuous Infrastructure Management: Terraform allows you to manage the lifecycle of your infrastructure. You can modify your configuration, reapply changes, and destroy resources when they are no longer needed. By using version control systems like Git, you can track changes, collaborate with team members, and ensure reproducibility.
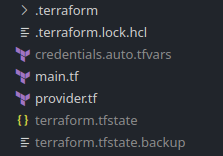
Environment Folder Layout Example

An example of a Terraform environment folder is given on the left. When a project is initialised (init) Terraform generates a .terraform folder. In this example I store my credentials in the credentials.auto.tfvars file that is ignored by version control. Terraform then reads any required credentials and secret variables from this file. There are other ways to do this such as using HashiCorps Vault or another secret store manager. But for getting started I found it easier to store them like this. main.tf contains my declared resources. which is an Ubuntu VM using the Proxmox provider in this case. I’ll be going into more detail about this in a future post. .terraform.lock.hcl is a dependency lock file which details the versions of the dependencies (providers and modules) that are in use and compatible with the current configuration.
provider.tf defines the Proxmox provider and any arguments it requires (which is Telmate/proxmox in this case). The state of the remote resources is stored in the terraform.tfstate file which can also be stored on remote storage such as S3, Terraform Cloud or another storage/bucket provider so your state is accessible anywhere and not just on your local computer. This state file is used to compare against the local declared state in main.tf. Terraform works out what is required to reach the required state as declared in your main.tf and applies this to the remote resource.
See the resources below for some more examples and best practices for project environment structure.
Basic Terraform Resource Examples
Here are some very basic Terraform resource snippets taken from the providers documention, to give you and idea of how resources are defined. Note that you would have to define other configuration, i.e provider, region, credentials etc for these to work.
AWS EC2
The below snippet shows an EC2 machine called test of instance type c5.18xlarge.
resource "aws_ec2_host" "test" {
  instance_type     = "c5.18xlarge"
  availability_zone = "us-west-2a"
  host_recovery     = "on"
  auto_placement    = "on"
}Cloudflare DNS Record
The below snippet creates a DNS A record at terraform.domain.tld pointing to the IP address 192.0.2.1.
# Add a record to the domain
resource "cloudflare_record" "example" {
  zone_id = var.cloudflare_zone_id
  name    = "terraform"
  value   = "192.0.2.1"
  type    = "A"
  ttl     = 3600
}Conclusion
Terraform simplifies and automates the process of infrastructure provisioning by treating it as code. With its declarative configuration language and multi-provider support, it empowers organisations, and homelabbers, to achieve infrastructure agility and scalability. By adopting Terraform, you can increase operational efficiency, reduce human errors, and ensure consistent infrastructure deployments across multiple environments. Plus save hours manually setting up resources! So why not explore Terraform further and learn more about automated infrastructure management.
I’ll be discussing how I switched to using Terraform to declare and provision my machines in my homelab in future posts.
Resources and More Info
Below are some useful resources that helped me get started and that I’m still learning from.
- Terraform.io
- Terraform Docs
- 10 Terraform Best Practices for Better Infrastructure Provisioning
- 20 Terraform Best Practices to Create Clean and Reusable Code
- Best Practices When Using Terraform
- Automate Cloudflare with Terraform and GitHub Actions! - Terraform Tutorial for Beginners - Techno Tim
- Terraform from 0 to Hero
- Terraform Best Practices free ebook
- Terraform Best Practices